Friday, February 3, 2012

Once Upon a Floor

Once upon a time there was a floor... in a little house... in the kitchen.

This is the story of how it was transformed to this...


from this...


In 1994 a newly married couple (me and Husband) moved into a little white abode and discovered...


10-ft ceilings!
2 fireplaces! 
A grand front porch! 
Old windows and door frames!
Generous rooms to fill with our dreams!

And... a rather alarming sight upon our kitchen floor.

It was... a carpet of many colors.

My husband said, "It looks like rows and rows of ants marching in lines while carrying different colored flags." 

That pretty much sums it up.

Underneath the marching rainbow ants we found squares of 1950's linoleum.
You know the variety... taupe with little flecks of turquoise, yellow, white and black.
Oh wait... I think the black is just dirt.


Husband was convinced that a "hard" floor of any type would be cold and well... hard. 
So we opted for carpet.  The first installation was pale blue.
Several years later it was NASTY... remember we're talking CARPET in a KITCHEN.
So we replaced it with a nice shade of green.

Once again time took its toll... the green wasn't so nice anymore and we began making funeral arrangements for the quickly fading mass of green.
I began to think of options.  Carpet cremation was top of the list.
Husband hadn't changed his view... but 18 years had passed and the reality of CARPET in the KITCHEN had at least put a chink in his armor. (insert evil laugh here)

What I really wanted was original wood flooring, but without the mess, expense, or stress of installing and refurbishing a perfectly beautiful pristine formal wood flooring.  Don't get me wrong... I LOVE the look of a pristine glossy oak floor... but my reality does not coexist with this level of perfection.

The horror stories I have heard of refinishing a wood floor also sent chills down my spine!  Dust in the whole house... the sanding process creating hills and valleys in the surface... fumes... disaster... and certain destruction and mayhem!

Then... I had an epiphany!

Wood Floors + Paint

If I install old reclaimed wood floors then I could just do a light sanding to take the sheen of varnish off the top and roll on some black paint... then scuff it up... distress it... If it got too distressed and beat up... I could just slap a new coat of paint on!

Paint solves everything!

I had 2 things working in my favor:
1) I have a Colorado Dad who knows how to lay flooring.

2) I found a company in Dallas who rescues things from old houses ready for demolition and salvages... door knobs and mantles and toilets and cabinets... and of course wood floors.  They had MORE than enough square footage for my kitchen at $1.87 a square foot! That is a bargain folks! Some of my other options were up to $12 a square foot! 

I had one more obstacle... Husband.
I called ready to go into all the gory details.
You know what he said?

"Honey, just do it"

Seriously?

I love that man.

I enlisted the moral support of 2 friends from work and we spent our lunch hour driving over to the Discount Home Warehouse (a terribly boring name for a magical place filled with objects that have lived previous lives). I then proceeded to sweet talk/bully the proprietor into helping me load 150 square feet of flooring into my mini-van. 

You can visit this warehouse at http://www.dhwsalvage.com/... but trust me the website doesn't do it justice!  If you're in the DFW area and love old things... it's worth your time to stop and look at their ever changing inventory.

So the big day came!  I took a day off from work, sent the kids off to school and tore in! Colorado Dad and Husband pulled up the green fuzzy mass to reveal purple padding.


We set up a carpentry workshop on the front porch...


Measured twice (or three times)... and cut once!


And I happily watched the new (old) floor begin to emerge.


I'd like to say the transformation included nothing except a magical wand... but in reality it took four of us (me, Husband, Colorado Mom and Dad) every minute from dawn...
til the clock struck midnight...
to get the full installation accomplished. 

Because we were using reclaimed wood... some of the pieces already had been cut on one end... so we had to sort the wood into 3 sections. 
• Northerners (these were planks cut on the "Northern" end)
• Southerners (planks cut on the Southern end)
• Pacifists (planks that had not been previously cut)
We needed to use as many planks as possible without making additional cuts... so it was definitely a puzzle.  In the end we didn't have near enough Southerners, so some of the Pacifists had to be persuaded over the Mason Dixon Line.

The end result was amazing!

Once the floor was installed... it was so beautiful!  The thought of haphazardly rolling on black paint made me pause to consider other possibilities.  I still didn't want a "perfect" high gloss wood floor... plus with pine cabinets there was waaaaayy too much wood going on. 

Then... a compromise began to form in my mind... paint still colored my vision... but with some of the floor showing through. 

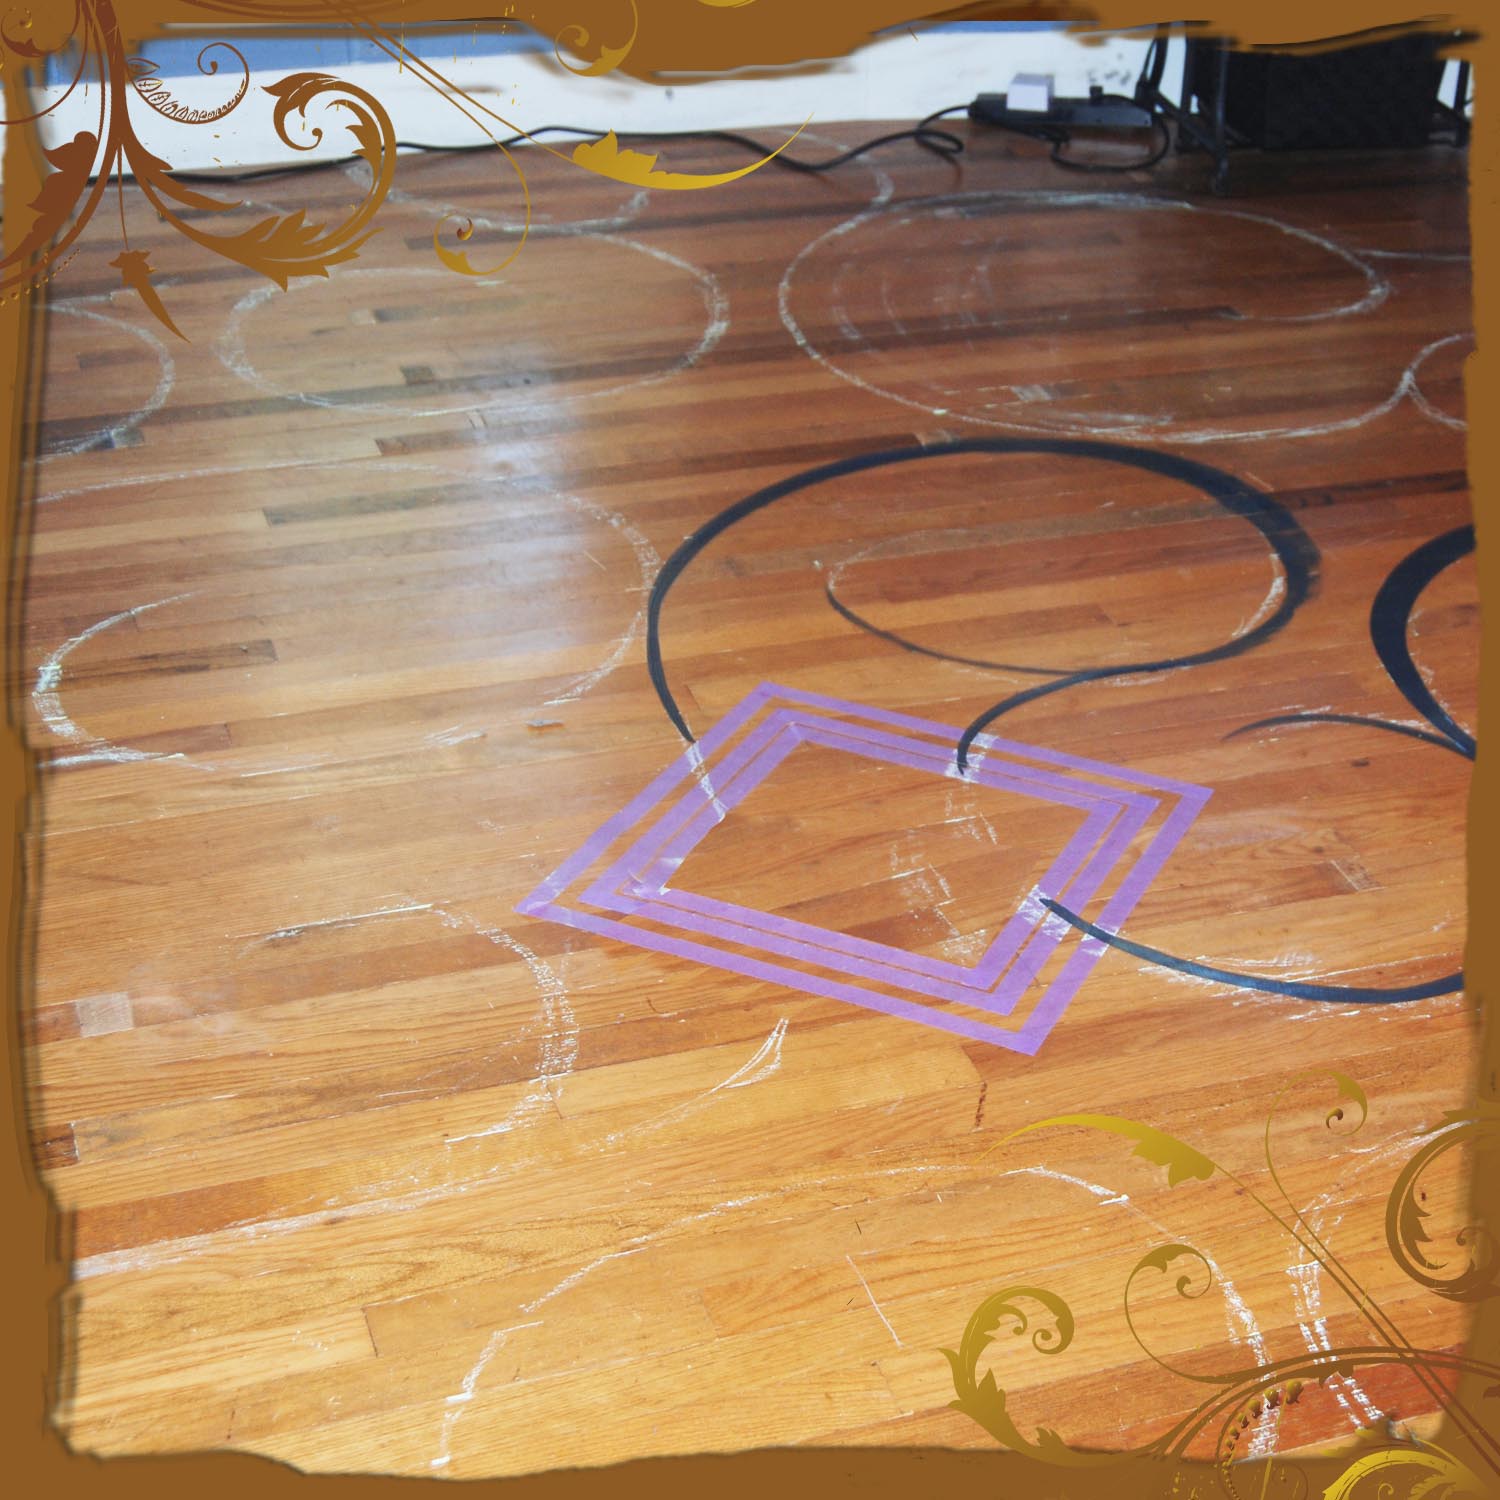
With a hand sander I took off the "shine" from the top of the floor... got out my chalk and started sketching in a design. I taped an offset "square" in the middle of the room where I planned to paint in a "monogram".   In the image below you can see the taped area...the sketching in chalk and the first few painted black swirls going in.


Next I traced the chalk lines with black paint. Once the swirls were complete, I then shaded inside some of the curves to create a look of age and depth.


Here is a view from the other direction.


The contrast was a little too dramatic (even for me)... so I diverted from my original plan and covered the entire floor (except for that middle area where the monogram was going to be placed) and stained it with a darker hue.  I personally like the stain over the black paint because, again it adds "age" and layers.

This was really the step I had not wanted to get into... because the stain was quite smelly and even though it was "dry" by the morning... it required a 72 hour drying period before you could move to the next step.The fumes were quite bad and that first morning I woke up with a fierce headache after a night of fitful dreams.  I opened doors, windows and turned the fans up on high... definitely need some ventilation boys and girls... if you're going to try this at your own home.


Now... Time for the monogram!

Since we live on a farm and often have wheat in the field surrounding our home... I decided to start with some wheat sprigs... not sure sprigs is the technical term... but you get the idea.


Next I taped off the "M" for Merrifield. 
The stars and stripes paper plate is acting as my palette.


And here's the final product.  


At the very end I brushed back over the entire surface with a satin water based varnish (3 coats with plenty of drying time in between). I chose this finish because I didn't want the high gloss look.  I have to say I love the final result. 
It is imperfect, artistic and different than anything I've ever seen.
I don't excessively worry about scuffing it up... and if it gets some wear and tear so much the better.

Me and my new... old... swirled... painted... shabby... gaudy... elegant... wood floor
are living happily ever after!


One more note about my Prince Charming. 
He actually admits that he kind of likes the new floor... and has been caught (on more than one occasion) sliding  across the surface in his stocking feet. 
So it really is a happy ending!  Or actually a happy beginning...


Thursday, February 2, 2012

Tricky in the Kitchen: Take 1

~ Elevate the Humble Cake Mix ~


1) Mayo in the Mix: Add 1 heaping tablespoon of full-fat Mayo. 
I know it sounds weird... but mayo is really just "emulsified oil". 
Think of it as a rocket booster to the oil or butter already in the recipe. 

2) Vanilla makes everything better!
Add 1 teaspoon vanilla extract to the mix. 
When aded to almost any cake mix vanilla adds a little "extra"...
whether white, yellow, strawberry or chocolate...
vanilla can add another layer to the flavor. 

3) Beat the Buzzer! Do NOT overcook the cake! 
A cake will continue to cook for a few minutes once it is removed from the oven... so take it out just a minute or two before it is really "done" so that not one drop of extra moisture is lost.

One bite... and you'll thank me!!

Tuesday, November 15, 2011

Balcony or Basement?

 
  There's a little book one of the sisters in my forest gave me for Christmas a few years ago.
There is a jewel which I mined from it's pages and have carried in my pocket ever since. 
Here's the heart of it...

Imagine you are standing on a stage in a theater...
above you there is a balcony...
below you a basement.

Balcony People
They are the ones who…
Believe.  
Scaffold.
Pray.
Inspire.
Cheer whether you’re winning or not.
Mentor.
Make burdens light.
Buoy.
Tell the truth.

You know who they are.
Family and friends… authors… singers… ancestors…
You may know them personally, or not. 
Identify Them.
Name them.
Love them.
Listen.

Basement Dwellers
They are the ones who…
Beat you down.
Suffocate.
Discourage.
Curse.
Sabotage.
Revel in loss.
Abandon.
Lose hope.
Manipulate.

Who is in your basement?
Family and friends… authors… singers… ancestors…
You may know them personally, or not.
Identify Them.
Name Them.
Love them.
Do not listen.

I am thankful in this season to have a balcony which is filled to overflowing.
I dare not begin to list the faces which I see when I tilt my head upwards...
I know I would leave someone out. 

Identify your Balcony People.  
(You're probably in their balcony too.)
Call them... write them a letter... tell them.


Where do YOU live in the theater of your friends and family?
Upstairs or down? 

Think about it… and increase your altitude if necessary!


Credit Where Credit is Due ~
The fiery sunset pic is the work of my Colorado Mom...
who is definitely in my balcony! 

Tuesday, November 1, 2011

C³ ~ Corn on the Cob in a Cooler

A friend sent me this recipe and I tried it that very same evening!
It was so easy and worked like a charm...
When cooking for a crowd it's the only way I'll do it... from this day forward.


Pre-Party Prep
  • Shuck and clean corn (or purchase the pre-shucked variety).
  • Place the corn in the bottom of a cooler that seals with a tight lid.
    (I'm not sure a Styrofoam cheapie would do the trick in this case...
    It's the insulated quality of a real deal igloo-type cooler that makes this work.)
  • Boil enough water in a large pot to cover the corn in the bottom of the cooler (a couple of gallons).
  • Pour water over the corn (CAREFUL Peeps!  I'm not kidding... the water is boiling for a reason... it is VERY hot.)
  • Close the lid and set the timer for 30 minutes.
  • In the meantime... set out all the fixins.
    • Butter (of course)
    • Salt and Pepper
    • Gourmet Salt (Black Sea Salt anyone??)
    • Fresh Grated Parmesan Cheese (ooh la la)
    • Chili Powder and Lime (ole')
    • Lemon Pepper
    • Garlic Salt
    • Cayenne (some like it hot!)
  • Times Up!  What are you waiting for??  Open the lid, and chow down!

After-Party Makeover
Happily... I overestimated (just a little) the corny consumption of our crowd... so I sheared the leftover cobs and threw the extra corn in a Ziploc.  The next day the the golden kernels made another star appearance in a simple corn, hominy and black bean relish to accompany fajitas for the family. 
It was just as good in the re-run as it was in the premiere!

Three Cheers for the Ears!!

Monday, October 24, 2011

Homemade Marshmallows... Happy Sigh.

So I guess it's time to explain the "marshmallow" piece of my blog/life. 
A few years ago my Colorado Mom introduced me to
Homemade Marshmallows...
(did you just hear angels and harps in the background??)
I admit... I have become more than a little obsessed. 

I don't know why... but beating gelatin and sugar into fluffy goodness...
just melts all the stress smooth out of me. 
Not to mention the fact that at the end of the day,
you're left with little bites of melt-in-your-mouth squares
(yes homemade ones are square). 
You can tint, flavor, dip, sprinkle, and toast these gooey cubes,
into an ENDLESS array of delicacies.
Are you a Marshmallow Skeptic?
I DARE you to try again.


No disrespect to the store-bought puffs...
they have their place in rocky road ice cream and
perhaps sprinkled on sweet potatoes at Thanksgiving... 
but these homespun creations are a different breed altogether. 
(Like comparing a store-bought tomato in December
with a sun-warmed crimson globe plucked straight from a Texas garden in the middle of July.)
Some comparisons are just not fair.

My favorite mallows (so far) are good old-fashioned vanilla!
Until you have had one of these toasted over an open fire...
I daresay you haven't lived. 


Kitchen Necessities:
  • Glass baking pan (you choose the size depending on the size of marshmallow you desire... 8 1/2 x 11 for a thinner (mini-mallow)... 9 x 9 for a fatter (bonfire-worthy mallow)
  • Mixer - you just can't pull this off without at least a hand mixer... but a stand mixer is ideal.
  • Candy thermometer OR a cup of ice water (I'll tell you more about that in a minute).
  • Pizza Cutter (or just a large knife will work).
Here's the Potion:
  • 3 Tbsp (packages) unflavored powdered gelatin
  • 1/2 c. cold water
  • 2 c. granulated sugar
  • 2/3 cup corn syrup
  • 1/4 c. water
  • 1/4 tsp salt
  • 1 Tbsp vanilla
  • Powdered Sugar
  • Raw Sugar (colored sugar)... (if desired)
Step by Step:
1)  Bloomin' Gelatin ~ In your mixing bowl pour 1/2 cup of cold water and sprinkle the 3 packages of gelatin over the top stirring just until all the granules are damp. Let it sit while you prepare the stove top concoction.  

   
2)  Stove Top Rock ~ In a small sauce pan combine sugar, corn syrup, 1/4 cup water and salt.  Stir until combined. Turn heat on medium high and stir frequently.


3)  Firm Ball ~ If you have a candy thermometer, you're looking for "firm ball stage" or 250 degrees (244 if high altitude).  If you don't have a candy thermometer, then fill a cup with water and add 3 ice cubes.  Keep beside your pot (I'll tell you why in Step 4).
 4)  Stages of the Moon... (I Mean the Syrup) ~ Your mixture is going to go through some stages... it will start out kind of cloudy looking... once the sugar dissolves then it will be clear and syrupy... then bubbles will begin... next it will later bubble like crazy and "foam up"... finally the bubbles will settle down and lose their "foamy" quality.  It is at this stage that you want to start testing the temperature of your mixture.  Very carefully drop one or two drops of the mixture into the ice water.  The drops will sink to the bottom of the cup.  Immediately put your hand into the ice water and touch the "glob" at the bottom.  You are looking for a "firm ball" consistency... this means that the glob will still be "ball shaped" and will be "firm" to touch... not hard as a rock, but firm.  If it is still too soft, then keep cooking... the mixture has not yet reached the correct temp.  After a minute more... try again. 


5)  Mix It Up ~ Turn your mixer on low and begin combining the gelatin and water mixture that is now in full bloom. CAREFULLY pour in the HOT mixture. Did I say carefully?? I mean it! This is hot folks, and if it gets on your skin it will stick and burn.  It is a fabulous idea to wear a kitchen mitten when performing this stunt. Once the hot mixture is completely poured into the gelatin, turn up the mixer speed to the top level.
6)  Prepare the Pan Man ~ While your potion is mixing and fluffing, prepare your glass pan.  Spread shortening onto the bottom and sides of the pan.  GENEROUSLY sprinkle powdered sugar on top of the shortening.

7)  Nearing the Finish Line ~ After the mallow potion has been whipping for 10 minutes or so, it will be white and will have at least  doubled in size. You will suddenly hear your mixer begin to strain a little... this is your signal that you're almost there!


8)  Flavor Time ~ Turn down your mixer speed to low (If you don't turn it down, you may end up with a ghostbuster's-like glob of mallow on your counter or floor... consider yourself warned!)  Add 1 Tbsp vanilla to the  mixture and continue beating just until combined.

9)  Sticky Business ~ Now for the fun part.  Transfer your mallow mixture out of the bowl and into your prepared pan.  A little "Tricky in the Kitchen" tip here... If  you spray your hand with "Pam" you can handle the mallow mixture (a little) more easily.  It is still extremely sticky, so just do your best.
10) Pat Down ~ Once the mixture is in the glass dish... wash your hands and dry thoroughly. Pour 1/2 cup or so of powdered sugar onto the top of the potion. You can now pat down the mallow mixture using the powdered sugar as a barrier between your skin and the VERY sticky surface.  Pat down until the mixture is evenly dispersed and level.


11) Time to Rest ~ Let sit overnight on the counter covered with a dry kitchen towel.  (Try to wait patiently.)

12) Un-Pan That Mallow ~ The next day... sprinkle powdered sugar onto a large cutting board and turn out the mallow onto the surface. It will be in one piece (like a pillow). 
13) Divide and Conquer ~ Use a large pizza cutter (or knife) to cut the pillow into 2 inch squares (or whatever size you so desire).  The edges of the marshmallows will be very sticky so roll in either powdered sugar, or raw sugar if you want a little sprinkly crunch on the outside.  (I usually do a combination of the two methods so that people can choose).  BOTH varieties toast well... the sprinkled version giving a sort of "brulee" outside once toasted... careful though!! Hot sugar is really HOT when heated so be sure to let either version cool down before popping into your mouth (or between layers of graham crackers and chocolate).


14) Store and Share ~ Store in a large Ziploc bag... mallows are most intensely soft when they are fresh, but will last for 2 or 3 weeks if kept in a dry cool place.  The texture will get a little more chewy as they get older... Some people love these the older they get (not the people... the marshmallows).  I have a DEAR friend who loves those crazy peeps Easter marshmallows for Halloween... each to their own.  I've never tested the outermost extremes of Marshmallow Life, but since there are no milk or perishable products in them, I guess they could last indefinitely.


Don't let the steps frighten you... If you're not an adventurer in the kitchen... pass this along to a friend with the promise to let you taste the spoils. (And if you just happen to wind up with some homemade mallows right around the time of an upcoming camping trip... serendipity!)


Wednesday, October 19, 2011

Outstanding in the Field

I attended a FABULOUS event this afternoon!  When wine is involved at 2:00 in the afternoon it is off to a very good start... just sayin'.

So check out http://www.outstandinginthefield.com/... beautiful table settings... local farms... fresh food... this is the "real deal" if you're a foodie.


The centerpiece is... the table.
Set in a long sequential row along the available landscape...
in this case a sidewalk on a goat farm.

What? Does a goat farm not sound very inviting?  Well mix in a 5-course gourmet meal, (did I mention wine pairings), artisan cheese makers, a chef, a great friend, unknown strangers who share a love of all things delicious and delectable, the great outdoors, some really cute furry creatures (goats)... and equally impressive "guardian" dogs and you have a combination for an extremely lovely afternoon! (understatement).

This is the menu... simple, elegant and filled from tip to top with layers of rich deep flavors... and of course goat cheese!


So your only assignment is to bring a plate... any plate... this way each table setting... at each event... is unique... and lovely... and filled with stories. They stacked them up like mismatched jewels.


I chose this one...


I picked it out when I was only 15 years old.  At a darling little antique store in Brenham, TX that was once a drive in theater.  When I was 12 we moved from Houston to Austin and we journeyed this route maaaaany times.  With each passage I would stop in and leave a little cash in order to pay down my "layaway" plan. 
Finally... when my grandparents came for my high school graduation, they stopped in and paid the ransom left on my china set and brought it to me as a graduation gift. happy sigh.

It now lives in my china cabinet and comes out on special occasions.  It is very old fashioned... and quaint.. and not progressive... and I adore it.

My friend brought this one... Her grandmother dined upon it.

The gentleman across from us was charming... hilarious... enthusiastic!
His wife a doll.
He asked a great question!
"What is the most amazing thing you have done in your life?"
That's a biggie! Wedding and children weren't allowed as an answer... those are the obvious ones. 
Something else? What?
Not sure the answer... Something epic? 
I'll have to hover over the options.
I've got to ponder this one.  I love questions that require pondering.
We shared stories with strangers... we laughed... and almost cried... and tantalized our senses.


In addition to the layers of flavor... there was laughter and faith and friendship folded into the afternoon. 
It was good. It was very good.


Sunday, October 2, 2011

Family Forest

I am very proud to say that I don't have a family tree... it's a forest. 

Seriously.
 
In high school I was assigned the task of drawing my family tree on a chalkboard.  Needless to say, I filled every square inch of green.  It was then that I realized that my "tree" was more like a wilderness... with quirky little poplars and towering pines.


  • I am one of 8 children.
  • I never lived with a sibling full-time until I was 17.
  • I have no "full" siblings... they are all steps or halves.
  • I am an "only", "oldest", "middle" and "youngest" depending upon which branch of the family tree you are exploring (however I have only/oldest personality traits... primarily).
I will not bore you with the mind-numbing details of marriages, divorces, who belongs to whom, etc... it's all fine print anyway.

The bottom line... the whole brood is family...

We are loud... opinionated... loyal... imperfect... elaborate... simple... often musical... definitely dramatic... down-to-earth... deep thinkers... desperate for grace... salt and light... soiled... deeply rooted... moody... and beyond. 

To deliciously complicate matters, almost 18 years ago, I was grafted into another large family when my husband and I tied the knot!  Though not nearly as complex, they are also a meandering vine!
We even get to count many of them as neighbors since we live on a family farm.

To keep it as simple as possible, I have 3 distinct sets of family... 
The Colorado Parents, the Houston Parents... and the Farm Family. 
It's been really fun recently that some of my different trees have begun to intertwine. Last Christmas we spent the holidays with my Colorado Parents... and my Houston Sisters came with us.  At one point Colorado Brother queried as to exactly how he was related to the Houston Sisters (not at all actually)... he created a new familial definition...
Non-Descript-Half-Step-Sisters... I love it!!

I did manage to fit my Farm Family's immediate leaves into the traditional structure of a tree a few years ago.  My Farm Mom specifically requested it for Christmas and then my Farm Sister had to have one too. =) 

I started the design on a piece of paper with MERRIFIELD as the "trunk" and then simply started attaching the names (crossword puzzle style) trying to keep things in the general correct "shape" of a tree... (not too lopsided... wide or tall).  

When the names were all added (be sure to double check... you would not want to accidentally omit a leaf!) I sketched in the curved branches and then worked with paint and canvas to achieve the final product.  

We've added two new leaves (Catherine and Caleb) since the original painting, so if you attempt something like this at home, be sure to leave room as the family grows. =)